I discussed in a previous post of the benefits of DataOps (and showcased MLflow and Kubeflow) and even earlier about the benefits of monitoring distributed systems and Kubernetes. Today I want to discuss of data-mill, a project I initiated during the last christmas and recently open-sourced on Github (under AGPL license), which combines DataOps principles and concepts from ongoing efforts (e.g. the already mentioned Kubeflow) to provide a complete cloud-agnostic architecture to develop data analytics applications.
1. Motivation
Triggered by the Data Science hype, many companies started working on the topic but only few are really successfull. The main barrier is the gap between the expectations of the stakeholders and the actual value delivered by models, as well as the lack of information over incoming data, in terms of both data quality and the processes producing them. In addition, projects require a very interdisciplinar team, including system administrators, engineers, scientists, as well as domain experts. Consequently, a significant investment and a clear strategy are necessary to succeed.
Moreover, typical lambda architectures (i.e. one that combines a streaming layer to a batch one) bring in significant complexity and potential technical gaps. Whilst continuous-integration and deployment (CICD) can automate and speed up to a great extent (using unit and integration tests, as well as frequent releases) the software development cycle, generally data scientists tend to work in a different workflow, and are often operating aside the rest of the team with consequent information gaps and unexpected behaviors upon changes on the data they use and the models they produced.
In this setup, waste of resources is the norm.
The goal is therefore to enforce DataOps practices for solving common problems:
Moreover, typical lambda architectures (i.e. one that combines a streaming layer to a batch one) bring in significant complexity and potential technical gaps. Whilst continuous-integration and deployment (CICD) can automate and speed up to a great extent (using unit and integration tests, as well as frequent releases) the software development cycle, generally data scientists tend to work in a different workflow, and are often operating aside the rest of the team with consequent information gaps and unexpected behaviors upon changes on the data they use and the models they produced.
 |
| Fig. 1: Typical DS software development process |
The goal is therefore to enforce DataOps practices for solving common problems:
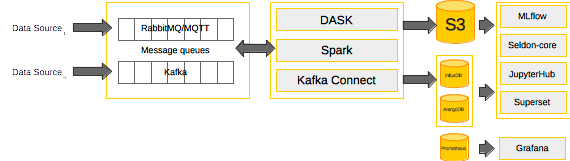
- Data ingestion
- logs - Confluent Kafka ecosystem
- sensor data - AMQP and MQTT protocols (e.g. RabbitMQ)
- Data storage and versioning
- local S3 datalake (e.g. minio)
- data versioning (i.e. pachyderm)
- Data processing
- batch processing (e.g. Dask, Spark)
- stream processing (e.g. KSQL and Kafka streams, Spark Streaming)
- Monitoring of distributed services
- metrics - timeseries database and dashboarding tool (e.g. prometheus and graphana)
- logs - Elastic stack
- Data Exploration
- spawnable development environments (e.g. Jupyterhub)
- Experiment tracking
- model training, benchmarking and versioning
- versioning of development environment
- Model serving
- collection of model performance and user interaction (e.g. AB testing)
With this in mind, I initiated the data-mill project, to simplify the setup of the development environment and process.
- Kubernetes setup
- local using minikube, as well as microk8s and multipass+microk8s
- remote, using sample scripts in KOPS for the setup on AWS and GKE
- Setup of common components
- Ingestion (e.g. kafka, RabbitMQ)
- Persistent storage (e.g. s3, ArangoDB, InfluxDB)
- Data Versioning (e.g. Pachyderm), see example
- Processing (e.g. dask, spark)
- Exploration Environment (e.g. JupyterHub)
- BI Dashboarding (e.g. superset)
- ML model versioning and benchmarking, as well as project management (e.g. mlflow)
- ML model serving (e.g. Seldon-core)
- Monitoring (e.g. prometheus, Grafana)
- Data Science environments
- Scientific Python Environment
- PySpark Environment
- Keras/Tensorflow Environment
- Keras/Tensorflow GPU Environment
- Example code
The project logo is reported below:
In the video, I am showing as example how to start the kubeflow flavour.
| Fig. 2: the data-mill project logo |
With its symbolic meaning, the logo entirely reflects the purpose of a team embarking on a data science project. The mill is the place where farmers bring their wheat to produce flour and finally bread. As such, it is the most important place in a village to process raw material and obtain added value, food. In addition, the inner star is a 8-point star, which, beside religious symbolism (of life and regeneration) also represents the polar star, historically used for navigation.
2. Infrastructure setup
The file run.sh is the entrypoint to the framework:
Usage: ./run.sh [debug-mode] [params] [options]
debug mode:
DEBUG: -d
params:
LOCATION: -l (local cluster), -r (remote cluster)
ACTION: -s (start only), -i (install), -u (uninstall)
options:
CONFIG_FILE: -f filename.yaml
-> overwrites the default component configuration filename
TARGET_FILE: -t filename.yaml
-> overwrites the default k8s configuration filename
COMPONENT: -c component_name
Specifically:
- LOCATION: local (-l) to the node by installing minikube, remote (-r) to a VM or a Cluster
- ACTION: install (-i) the components or delete them (-d) using Helm
- CONFIG: the default config file for each component is config.yaml, -f [filename] defines a different project config file
- COMPONENT: runs the ACTION only for the specific component, regardless of the project flavour
Components are stored at in the components subfolder. Each component consists of a setup.sh and a bunch of config_*.yaml files, possibly reflecting different environments or cluster setups.
The actual configuration file for the specific component is then referenced from therein, e.g.:
kafka:
release: kafka
config_file: kafka_config.yaml
The project-wide configuration is stored in the infrastructure flavours folder as default.yaml:
project:
# namespace
k8s_namespace: data-mill
# the port on which the K8s UI is exposed
proxy_port: 8088
# the flavour is used to list all the components to be used in the project
flavour: all
# k8s default config, can be overwritten with -t filename
k8s_default_config: default_uc.yaml
# component default config, can be overwritten with -f filename
component_default_config: config.yaml
# set the data folder
data_folder: data
The flavour attribute indicates which components are to be included in the project the default is related to. You can use "flavour: all" or list the component names e.g. "flavour: spark, jupyterhub". When using "flavour: all" the components are taken in alphabetical order, so it is necessary to list them if you have dependencies across them. The "k8s_default_config" is used to specify the default filename for cluster configuration, this can be overwritten with "-t filename". For instance, "default_uc.yaml" in "k8s/configs" specifies a microk8s cluster. This target can be overwritten with "-t" or directly in the flavour file, for instance using "default_mc.yaml" to target a minikube cluster. The "component_default_config" is used to specify the default configuration filename for each component, and can be overwritten with "-f filename". With "-f filename" we can specify a different flavour than the default one, and overwrite the config of each file (if "filename" exists, or fallback to "component_default_config" where it doesn't). The data folder is where the code examples are stored, along with the bucket structure that we want replicated to the local datalake.
The projects is structured over the following folders:
- components - containing the installable components
- data - is mounted as PV and PVC and eventually available in the Minio S3 data lake, it can be used to provide example code
- flavours - where configurations are stored. A file define the project details, and a flavour, i.e. a group of components to be used in the project
- helm-charts - contains the code used to develop helm charts that were not available to us at time of development
- k8s - contains the cluster setup and configuration data
- registry - contains the details to manage a local docker registry
- utils - contains bash utility functions (e.g. arg parsing)
3. Example Flavours
The components were successfully tested on all 3 local environments and a few example flavours are provided to get quickly started:
- default - installs all components in alphabetical order, which can be highly memory consuming so use with caution
- datalake_flavour - installs the minio S3 and pachyderm to set up a datalake; this is the smallest flavour concerning pachyderm and a datalake;
- kubeflow_flavour - installs minio, pachyderm and kubeflow (using ksonnet), the integration of kubeflow was successfully tested, however we suggest installing kubeflow in a separated namespace (i.e. see the config for the component and the README) since upon deletion using the default kfctl the entire namespace is deleted
- datawarehouse_flavour - installs minio, pachyderm, kafka, rabbitmq, superset, spark and the monitoring-stack.
- explorative_flavour - installs minio, arangodb, influxdb, superset, jupyterhub, dask and seldon.
 |
| Fig. 3: an example flavour |
Feel free to play around with any combination you may like or need.
4. Common functions
4.1 Starting a cluster
A cluster can be setup and started (or started if already available) with: ./run.sh -i -l -s
This will use the default flavour and k8s config.
To overwrite this behavior a different flavour can be passed with "-f flavour_config.yaml" or a different target file "-t target_config.yaml" can be set.
In the video, I am showing as example how to start the kubeflow flavour.
4.2 Debugging environment
A debugging environment (i.e., a pod within the namespace providing an interactive session) can be spawned using "run.sh -d".
4.3 Installing local helm charts
We provide a subfolder to collect a few helm charts that were not yet offered at the time of development.
To install a helm chart from the infrastructure folder you would normally run something like:
helm install --dry-run --debug --name mlflow-test --namespace data-mill helm-charts/mlflow/
helm install --name mlflow-test --namespace data-mill helm-charts/mlflow/
with the first command testing the chart and the second actually deploying it on the default data-mill namespace.
Alternatively, just add our Git Repo as Helm repo too:
helm repo add data-mill https://data-mill-cloud.github.io/data-mill/helm-charts/
4.4 Accessing the Data Lake and Data versioning
We use minio as local S3 datalake service. Code examples are directly copied to the minio pod and exposed as a bucket.
Within the cluster, Minio can be accessed at <minio-release>.<namespace>.svc.cluster.local on port 9000 (or http://<minio-release>:9000).
Minio can also be managed from the minio/mc client, using port-forwarding to the pod:
export POD_NAME=$(kubectl get pods --namespace <namespace> -l "release=<minio-release>" -o jsonpath="{.items[0].metadata.name}")
kubectl port-forward $POD_NAME 9000 --namespace <namespace>
You can follow this guide to install the mc client. For instance:
mc config host add <ALIAS> <YOUR-S3-ENDPOINT> <YOUR-ACCESS-KEY> <YOUR-SECRET-KEY> <API-SIGNATURE>
The access key and secret of the deployed minio service can be easily retrieved with:
ACCESS_KEY=$(kubectl -n <namespace> get secrets <minio-release> -o jsonpath="{.data.accesskey}" | base64 -d)
SECRET_KEY=$(kubectl -n <namespace> get secrets <minio-release> -o jsonpath="{.data.secretkey}" | base64 -d)
And similarly the endpoint:
S3_ENDPOINT=$(kubectl -n <namespace> get endpoints <minio-release> | awk 'NR==2 {print $2}')
Now we can manage the objects on the datalake, for instance create ("mc mb minio/mybucket"), list ("mc ls minio/mybucket"), delete ("mc rm minio/mybucket/myfile").
Pachyderm is provided for code versioning purposes. This component is using the default minio datalake, where it creates a specific bucket.
The utility pachctl can be installed to interact with Pachyderm, see the guide here. Once pachctl is available, we can point it to the cluster's master node, or in case of a single node setup like minikube or mikrok8s to the sole node available:
export ADDRESS=$(minikube ip)":30650"
We can test the correct connection to the cluster by querying the version, for instance:
$ pachctl version
COMPONENT VERSION
pachctl 1.8.2
pachd 1.7.3
This shows that both the client and server were correctly setup. You can now go on with the official tutorial, here. The example below creates a new repo called images and lists its content, both before and after uploading an image from the web:
pachctl create-repo images
pachctl list-repo
pachctl put-file images master liberty.png -f http://imgur.com/46Q8nDz.png
pachctl list-repo
5. Data Science Environments
Jupyterhub is a multi-user server that can be used to spawn multiple jupyter servers with different computation requirements and runtime environments. Below are the standard Jupyterhub images that can be spawned:
As visible and also discussed here, there exists 3 main streams for the DS environments:
As visible and also discussed here, there exists 3 main streams for the DS environments:
- scipy-notebook is the base Python DS Environment, as this includes the entire scientific python, if you rather develop in R the r-notebook is to be used; alternatively, the datascience-notebook is a heavy DS environment that contains libs for Python, R, Julia and a bunch of datasets and libraries;
- pyspark-notebook is the extension of the Python DS to add the Spark Python libraries, this is further extended in the all-spark-notebook with R and Scala support;
- tensorflow-notebook is the extension of the Python DS environment to add tensorflow and Keras support; mind that this runs on CPU resources only;
That said, we provide the following extensions:
- python_env extending jupyter/scipy-notebook:latest
- pyspark_env extending jupyter/pyspark-notebook:latest
- pydl_env extending jupyter/tensorflow-notebook:latest
- pydl_gpu_env extending nvidia/cuda:9.0-base-ubuntu16.04 to add the whole jupyterhub stack as in the pydl_env;
- gcr.io/kubeflow-images-public/tensorflow-1.10.1-notebook-gpu:v0.4.0 the standard GPU notebook image used in Kubeflow
The images were pushed to Dockerhub and are automatically prepulled at deployment time using the prepuller hook of Jupyterhub. This can generate latencies during installation. If you use wait in the helm install (i.e. --timeout $cfg__jhub__setup_timeout --wait), a good practice is to set jupyterhub as the last component installed in the flavour list.
To verify the status: kubectl get pods --all-namespaces
A pod named hook-image-puller-* should be present:
...
data-mill hook-image-puller-sscns 0/1 Init:2/7 0 24m
To verify the status: kubectl get pods --all-namespaces
A pod named hook-image-puller-* should be present:
...
data-mill hook-image-puller-sscns 0/1 Init:2/7 0 24m
...
We can see what is going on with: kubectl describe pod hook-image-puller-sscns -n=data-mill
...
Events:
Type Reason Age From Message
---- ------ ---- ---- -------
Normal Scheduled 25m default-scheduler Successfully assigned data-mill/hook-image-puller-sscns to microk8s-vm
Normal Pulling 25m kubelet, microk8s-vm pulling image "jupyterhub/k8s-singleuser-sample:cc865bd"
Normal Pulled 20m kubelet, microk8s-vm Successfully pulled image "jupyterhub/k8s-singleuser-sample:cc865bd"
Normal Created 20m kubelet, microk8s-vm Created container
Normal Started 20m kubelet, microk8s-vm Started container
Normal Pulling 20m kubelet, microk8s-vm pulling image "jupyterhub/k8s-network-tools:cc865bd"
Normal Pulled 20m kubelet, microk8s-vm Successfully pulled image "jupyterhub/k8s-network-tools:cc865bd"
Normal Created 20m kubelet, microk8s-vm Created container
Normal Started 20m kubelet, microk8s-vm Started container
Normal Pulling 20m kubelet, microk8s-vm pulling image "gcr.io/kubeflow-images-public/tensorflow-1.10.1-notebook-gpu:v0.4.0"
so as visible, the pod is downloading our kubeflow notebook image.
Once started, the Kubespawner page on the hub displays the available DS environments:
 |
| Fig. 5: The Kubespawner UI |
6. Developing applications
The data folder contains example code in Python that is loaded as bucket in the local datalake. The files include examples on how to connect to services, such as S3, Spark, Dask, Keras/Tensorflow.
6.1 Connecting to the data lake
Connecting to the data lake can be done using the s3fs library, for instance:
import s3fs
s3 = s3fs.S3FileSystem(key='Ae8rNrsv8GoB4TUEZidFBzBp',
                       secret='2bd1769fa235373922229d65114a072',
                       client_kwargs={"endpoint_url":'http://minio-datalake:9000'})
6.2 Processing with Dask
When using Dask, a scheduler and multiple workers are spawned in the cluster. Dask distributed is provided as client to connect to the scheduler, e.g.:
from dask.distributed import Client, progress
c = Client("dask-scheduler:8786")
6.3 Processing with Spark
When developing Spark code, the provided pyspark notebook shall be used. A Spark session can be easily created with:
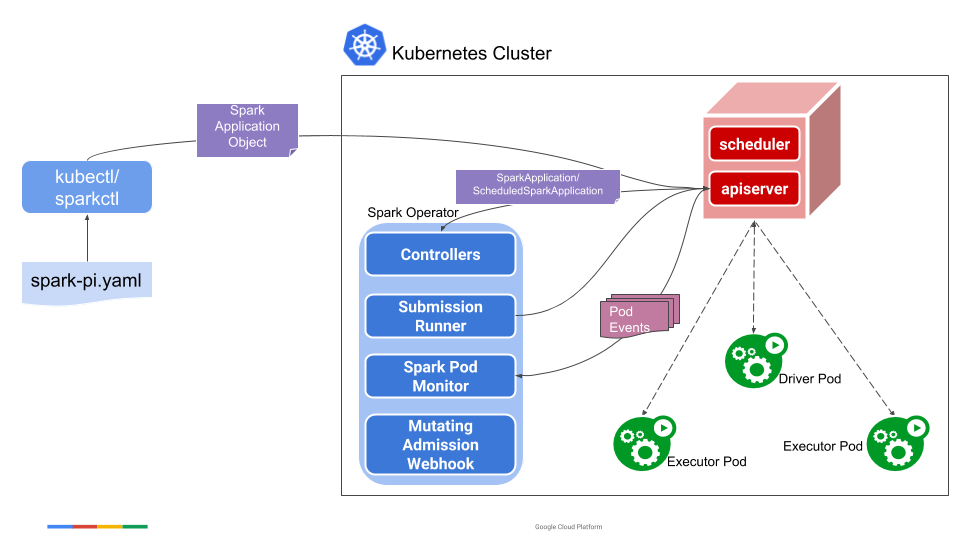
The Spark component is deployed as Kubernetes operator. That means that the code won't be runnable using the classic spark-submit to submit the job to an always running driver pod (for that you could rather run this instead of an operator), but rather spawned as any K8s resource (i.e. with kubectl apply -f resource_config.yaml), as shown in the example here, the guide here, and the diagram below:
With the pi application being something like:
import pyspark
sc = pyspark.SparkContext('local[*]')
The Spark component is deployed as Kubernetes operator. That means that the code won't be runnable using the classic spark-submit to submit the job to an always running driver pod (for that you could rather run this instead of an operator), but rather spawned as any K8s resource (i.e. with kubectl apply -f resource_config.yaml), as shown in the example here, the guide here, and the diagram below:
With the pi application being something like:
apiVersion: sparkoperator.k8s.io/v1beta1
kind: SparkApplication
metadata:
  name: spark-pi
  namespace: default
spec:
  type: Scala
  mode: cluster
  image: gcr.io/spark/spark:v2.4.0
  mainClass: org.apache.spark.examples.SparkPi
  mainApplicationFile: local:///opt/spark/examples/jars/spark-examples_2.11-2.4.0.jar
6.4 Processing with Keras & Tensorflow
We refer to our code example, showing the use of autoencoders for noise removal on image data (MNIST).
7. GPU Support
To enable GPU support you either set minikube/multipass VM to use a spare GPU or enable PCI passthrough, though this is currently only working for the bare microk8s version (I guess for license reasons on multipass).
 |
| Fig. 7: Spawning of a GPU notebook without GPU support |
I hope this project can help both those struggling when emarking on a Data Science project on K8s, as well as those teams looking for improving their data science software development process. I would really like to hear your feedback about it.
Andrea
Many companies want to start a data lake, but they often run into problems—such as not knowing where to begin and not knowing how to avoid mistakes. If you're thinking of starting a data lake for your business, there are a few things to keep in mind. How secure is your data lake? How do you add and remove data from your data lake? How will you make your data lake scalable? These are just some of the questions to ask yourself when you're getting ready to start yourData Lake.
ReplyDeleteOur group of technologists have been in the big data business for over a decade, and we've seen some things. Things like Hadoop, NoSQL and the cloud. We've seen the rise of Map Reduce, the fall of RDBMS, and the emergence of unstructured data. We've been to conferences (and built one of our own!) and have seen the buzzwords fly.
ReplyDelete